
Why Testing Soil Nutrients at Home is the First Step to Garden Success
Healthy soil is the foundation of a productive garden. When I first started testing my soil, I realized how important it is to understand the nutrient balance. Without testing, it’s hard to know if your plants are getting the right nutrients. I found that I was over-fertilizing and not giving my plants what they needed. Testing your soil shows if it’s low in nitrogen, phosphorus, or potassium. You’ll also know if the pH is off.
If the soil is too acidic or alkaline, some nutrients become unavailable. I recommend testing regularly to keep the right conditions for your plants. For example, making sure your soil is organic is a great start, and you can learn how to create organic soil for your healthiest garden here.
Pro Tip: Test your soil at least twice a year—once in spring and once in fall.
Testing soil nutrients at home helps you understand your garden’s needs. To get started, you’ll need some essential tools. These tools make the process easier and ensure accurate results.
Basic Tools Needed
Here are the basic tools you will need for soil testing:
- Garden Trowel – Use it to dig soil samples.
- Plastic Bucket – Collect and mix soil samples.
- Measuring Cup – Measure soil and water.
- Distilled Water – Essential for accurate testing.
- pH Test Strips – Check soil pH levels.
- Notebook and Pen – Record your results.
Advanced Tools And Kits
For more detailed analysis, advanced tools and kits are available:
| Tool | Function |
| Soil Test Kit | Measures pH, nitrogen, phosphorus, and potassium levels. |
| Soil Moisture Meter | Check the moisture content of the soil. |
| Soil Thermometer | Measures the temperature of the soil. |
| Electronic pH Meter | Provides more accurate pH readings. |
Using these advanced tools, you get more precise and detailed results. This helps in making better decisions for your garden.

What Are the Key Nutrients in Soil?
Plants need various nutrients to grow strong and healthy. After testing my soil, I learned that nitrogen, phosphorus, and potassium are the most important. I discovered a nitrogen deficiency that slowed leaf growth. By adding organic compost, I replenished it.
Pro Tip: When you find nutrient imbalances, use compost to naturally replace lost nutrients.
What Are the Different Methods for Testing Soil Nutrients?
There are several methods for testing soil at home. I started with a simple soil test kit, which was quick and easy. For more accurate results, I also used a digital meter to measure pH, moisture, and temperature. Combining methods gives a more complete picture. Sometimes, I sent samples to the lab for further analysis.
Pro Tip: Use multiple methods to get a clearer understanding of your soil.
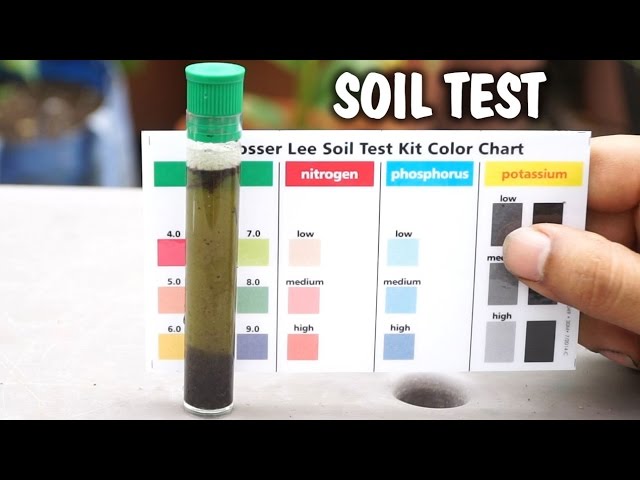
How to Use a Home Soil Test Kit?
To use a home test kit, I followed these easy steps:
- Collect Soil: Dig 4–6 inches deep from different spots in your garden.
- Mix and Dry: Combine the soil in a clean container and let it dry.
- Follow Instructions: Use the kit’s instructions carefully.
- Compare Results: Match the color results with the chart provided in the kit.
- Adjust Soil: Based on the results, I added compost, lime, or other necessary amendments.
Pro Tip: Be sure to use clean tools to avoid contaminating your sample.
How Accurate Are Home Soil Tests Compared to Lab Tests?
Home tests are a great starting point, but lab tests give you a much more detailed report. I’ve found that home kits help you identify major issues like pH levels or nutrient deficiencies, but lab tests provide an in-depth analysis of micronutrients and soil texture. When I ran a test at home, I thought I was done, but after sending it to the lab, I learned there were other nutrient gaps I hadn’t noticed.
Pro Tip: For specific plants or if you’re still facing issues, send a sample to the lab for more detailed analysis.
What Are the Benefits of Regular Soil Testing?
Testing your soil regularly is essential for plant health. From my experience, it helps in avoiding over-fertilizing, which can waste money and harm the environment. Regular testing helps you create better soil conditions, leading to stronger plants. It can also help you save on fertilizers.
Pro Tip: Keep track of your tests to track progress and spot trends over time.
How to Interpret Soil Test Results?
When I first tested my soil, I wasn’t sure how to interpret the results. A few key things to look for are:
- pH: Most plants prefer soil with a pH of 6.0–7.0.
- Nutrient Levels: If nitrogen is low, consider adding compost. If phosphorus is too high, cut back on fertilizer.
Pro Tip: Make slow adjustments to avoid shocking your plants with drastic changes.
How Can You Improve Soil Health Based on Test Results?
Improving soil based on test results is key. I added compost to boost organic matter and microbes, which helped improve soil structure. I also used organic fertilizers to add essential nutrients. Based on my test results, I adjusted the pH by using lime for acidic soil and sulfur for alkaline soil.
Pro Tip: Start small with amendments and test again after a few months to avoid overcorrection.
Challenges and Limitations of Home Soil Testing
One challenge I faced was that home soil tests sometimes miss important micronutrients. Home kits also rely on the sample you collect, so it’s important to be thorough and consistent. While DIY tests are helpful, they may not be as accurate as lab tests for complex soil issues.
Pro Tip: If you notice persistent problems, send a sample to a professional lab for more insights.
How Can Soil Testing Help Reduce Fertilizer Costs?
Soil testing helps you avoid wasting money on unnecessary fertilizers. By testing, I was able to see exactly which nutrients my soil lacked, so I didn’t over-fertilize. Knowing what my soil needed saved me money in the long run.
Pro Tip: Use slow-release organic fertilizers to maintain soil health over time.
Common Misconceptions About Soil Testing
Some myths about soil testing include:
- Myth: One test is enough. Truth: Soil conditions change, so regular testing is crucial.
- Myth: Any soil is good enough. Truth: Nutrients make a big difference.
- Myth: More fertilizer means healthier plants. Truth: Too much fertilizer can harm plants.
Pro Tip: Regularly test soil and adjust as necessary.
The Best Time and Frequency to Test Your Soil
In my experience, it’s best to test your soil in spring and fall. This allows you to amend your soil before planting. I test once a year for most of my plants, but more frequent testing is needed for certain crops or if you’re noticing poor plant health.
Pro Tip: Try to test your soil at the same time each year for consistency.
What Does Science Say About Rapid Soil Nutrient Testing?
Dr. C. Dimkpa and his colleagues in 2017 explored methods for rapid soil testing. Their research shows how quick nutrient tests help growers apply fertilizers more efficiently and improve soil health. I found this to be true when I adopted quicker testing methods and saw more effective results in my garden.
Read more: Methods for Rapid Testing of Plant and Soil Nutrients – SpringerLink
FAQs About Home Soil Testing
Can I test soil nutrients without a kit?
Yes, you can check basic soil traits using vinegar and baking soda for pH. For nutrient levels, use a test kit or lab analysis.
How often should I test vegetable garden soil?
Test once a year in early spring. For best results, test again in the fall before making changes.
What’s the cheapest way to improve soil pH?
Use garden lime to raise pH or elemental sulfur to lower it. Both are affordable and effective when applied correctly.
Final Thoughts
I highly recommend testing your soil at home to achieve healthier plants and a more productive garden. Regular testing helps you make informed decisions and improve your soil’s health. It’s simple, cost-effective, and can really boost your garden’s success.
Pro Tip: Take notes on your tests and changes made to see long-term improvements.
Want to see the soil testing process in action? Watch the video below for a quick demo. It’s perfect if you’re a visual learner or want step-by-step help.


One Response